Set up Your Mud Kitchen
-
Age: 0 to 8+
-
Time: 1 hour+
-
Materials: various household and kitchen materials, dirt and water
- Skills: Creativity, Sensory
Look around a classroom or the home of a friend who homeschools, and you quickly notice how spaces are arranged to promote active, independent play and learning. Good news? It's easy to set up a few simple centers— in your home, yard or even just in the form of a “go-bag” you can take to the park. Once you have these centers, it's easy to inspire hours and hours of independent play for your kids, too.
Setting Up a Mud Kitchen
Play with food and cooking is, quite possibly, the most universally appealing and accessible pretend play theme for kids at any age. Toddlers can emulate us making meals, and older children can use mud kitchens to cook up grand feasts, make concoctions or conduct science experiments.
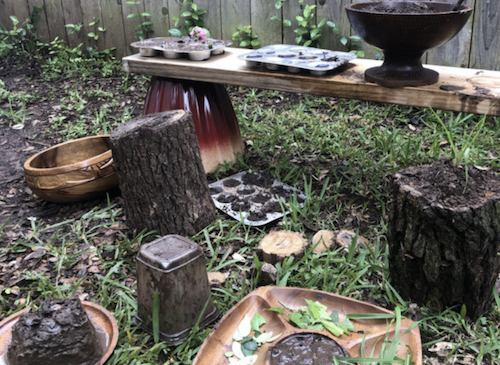
To make a mud kitchen, all you really need is a set up that allows kids to play with water and whatever set of bowls, scoops and other containers you can spare, with a little surfaces on which to mix, mash, stir and “cook.”
Mud kitchens can range from the simple (think, nesting metal bowls and a few cups to use as scoops) to the Pinterest-worthy. If you do not have green space attached to your home, grab a reusable shopping bag and fill it with bowls, scoops and a kitchen item or two that can take some muddy love and— voila—a portable mud kitchen!
Here’s a few tips on how to set up a mud kitchen that will inspire outdoor play all season long:
The Guide
Get quick inspiration!
Choose a spot for your mud kitchen:
Head to a spot outside with open dirt and access to what we at Tinkergarten call "nature treasures" (e.g. sticks, leaves, grasses, flowers, berries, tree fruits). If you have an outdoor water source (e.g. hose, creek), consider setting up nearby. If not, you can always bring containers of water with you.
If you don't have dedicated outdoor space, remember that you can fill a reusable shopping bag with any of the items below and head to a nearby green space to set up your pop up mud kitchen, too! Or, use flour and water to make a "kid kitchen" somewhere in your kitchen at home!
If you don't have dedicated outdoor space, remember that you can fill a reusable shopping bag with any of the items below and head to a nearby green space to set up your pop up mud kitchen, too! Or, use flour and water to make a "kid kitchen" somewhere in your kitchen at home!
Build the kitchen:
We’ve found that doing simple things to transform a spot into a mud kitchen heightens the experience and promotes even more imaginative play. For example:
- Work with kids to drape a tarp or bed sheet over a rope strung between two trees to designate the patch of earth as a special space. Or maybe just make a sign that says their name and "Mud Kitchen." Kids can enter and leave, and they just seem to know that special stuff happens there.
- Think about what objects you need in any kitchen. Then, use sticks, leaves, twine or even sidewalk chalk to turn a tree stump or log into a stove, a pile of sticks into a roaring fire, or the hollow of an old tree into an oven. Need some inspiration?
- You can use recycled materials and just things you may have around the house, kitchen or garage to create a space in which you can fashion some kind of sink/bowl for mixing, a place to store your scoops and tools and a space to work.
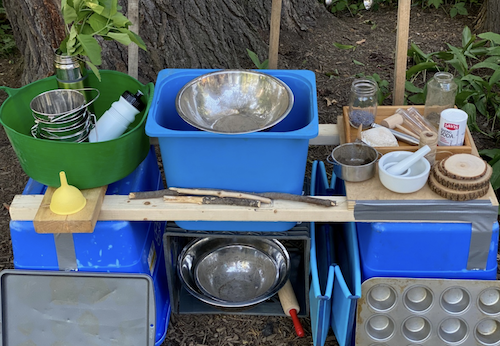
- Watch this quick video to see how to build a "no nails" mud kitchen. To make your own version of this "no nails" kitchen, you'll these materials:
- Recycling bins (2)
- ~6 foot lengths of 2’x4’ wood (2)
- Milk crate
- Small trash can
- Nesting bowls
- Duct tape
- Garden stakes, twine and pipe cleaners
Add in some cooking tools:
Gather a few kitchen tools that you don't mind getting dirty. You can also purchase or often swap/check local "freecycle" groups for a few tools that can be designated for this purpose. Some of our favorite mud kitchen tools include:
- Cake or pie pans
- Muffin tins
- Cookie sheet
- Ice cube trays
- Whisk
- Spoons
- Cups and bowls of various sizes
- Measuring cups and spoons
- Mortar and pestle

Don't feel like you need more than a bowl and water to get started. It's actually fun and promotes ongoing engagement if you add a new item to the kitchen every so often.
Manage the Water Supply:
The key ingredient in any mud kitchen is actually water. Not everyone has a hose, and even if you do, you don’t want kids to let it run endlessly as they play (and hoses have a way of doing that once placed in kids’ hands). Plus, it’s never too early to teach kids to conserve and to manage a limited supply of resources. For each play session, give kids a set amount of water or a container that they can use but have to fill up between uses. For example, you can fill a 3-gallon bucket of water, use a portable 2-gallon water carrier designed for camping or just fill a gallon milk jug or a few large water bottles. Let kids know that’s all the water for this play session or until you say it's okay to fill up again. Kids will quickly start to learn how to make that amount of water stretch—and you can get hours of play out of just a single gallon.
Let the cooking play begin!
Starting off play with just water and dirt is a great way to introduce kids to the mud kitchen. Once play really takes off, kids can add additional tools and “ingredients” from nature to their cooking play. Kids can use a bindle, bag or pail to gather sticks, leaves, seeds, tree fruits, flowers, grasses, etc. Kids can also pick up more as they cook. Find objects with a variety of colors, sizes, weights, and even smells to bump up the sensory impact. Need play ideas? Try out our Mud Bakery or our Cooking in the Mud Kitchen DIY activities.
Why is this activity great for kids?
Setting up a a Mud Kitchen— in your home, yard or even just a “go-bag”—can inspire hours and hours of independent play for your family. Playing and experimenting with ooey, gooey mud helps children to strengthen their sense of touch -- and we know that the better kids are able to tune and integrate their senses, the more effectively they can learn. Once kids know how to make and manipulate mud, they have a tool for play and building with virtually unlimited uses. Lots of our kids get to help in our kitchens, but an outdoor kitchen is their domain and one in which both kids and parents can totally embrace the mess. This kind of unbridled mess-making frees up kids to develop genuine creativity.


